• Blog
  • SHOP
    • View Cart
  • Baked
  • Brewed
  • Beautiful
  • About
  • Work With Me
    • Writing Services & Brand Collabs
    • Food Photography
    • Recipe Creation & Pairing Recs
    • Contact
    • Facebook
    • Instagram
    • Pinterest
    • YouTube
  •  

Baked, Brewed, Beautiful

How to Roast Coffee Beans at Home

in Beautiful, Brewed on 11/12/20

Instead of endlessly buying new coffee beans, try your hand at home coffee roasting to uniquely experience the freshest-tasting beans. 

two wooden bowls filled with green beans and roasted coffee beans
  • Save some money and learn a new skill by roasting your own coffee beans at home.  
  • All you need are some green coffee beans and a few kitchen items you likely already have on hand.  
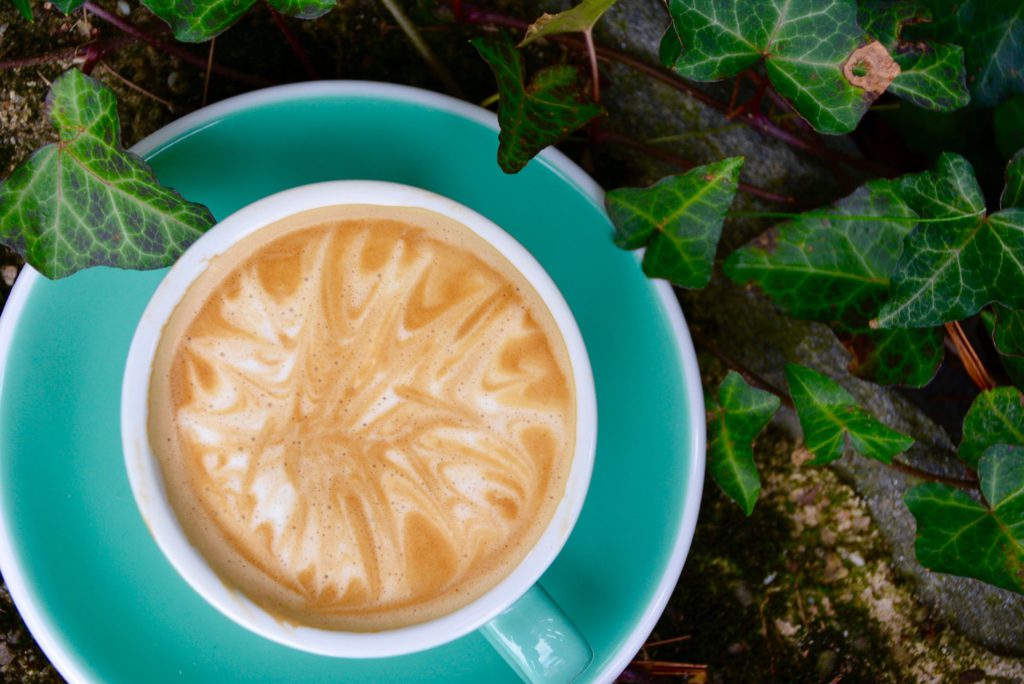
  • Brew your freshly roasted beans with the pour over method to extract the most flavor from your coffee beans.  

Home coffee roasting is a fun hobby that doesn’t require a big time investment nor does it call for fancy equipment. The basic essentials are green beans and some kitchen essentials that you likely already have in your home. 

To get started, take a look at the step-by-step home-roasting process below and start enjoying the freshest coffee beans right at home. 


Note: This method uses the cast iron roasting method. There are other home roasting options, but this is a great low-cost method. 

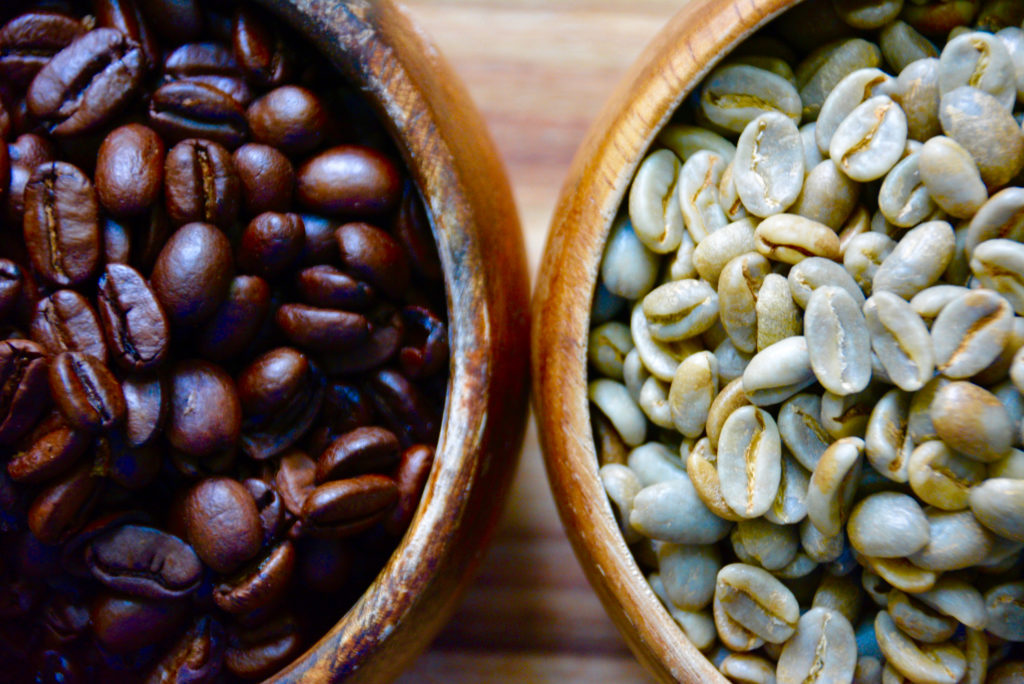
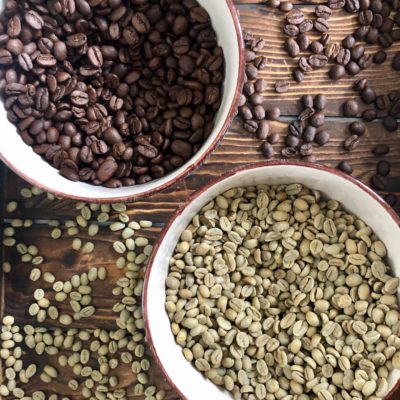
Source your green coffee beans. 

Before anything else, you’ll need to source your green beans. There are a number of spots you can order from online. My personal recommendation is Sweet Maria’s, as they offer a wide selection of bean varieties and bag sizes. 

Another green bean seller is Royal Coffee. They sell both 1-pound bags and bulk-size options, if you’re wanting to stock up on a lot of beans. 

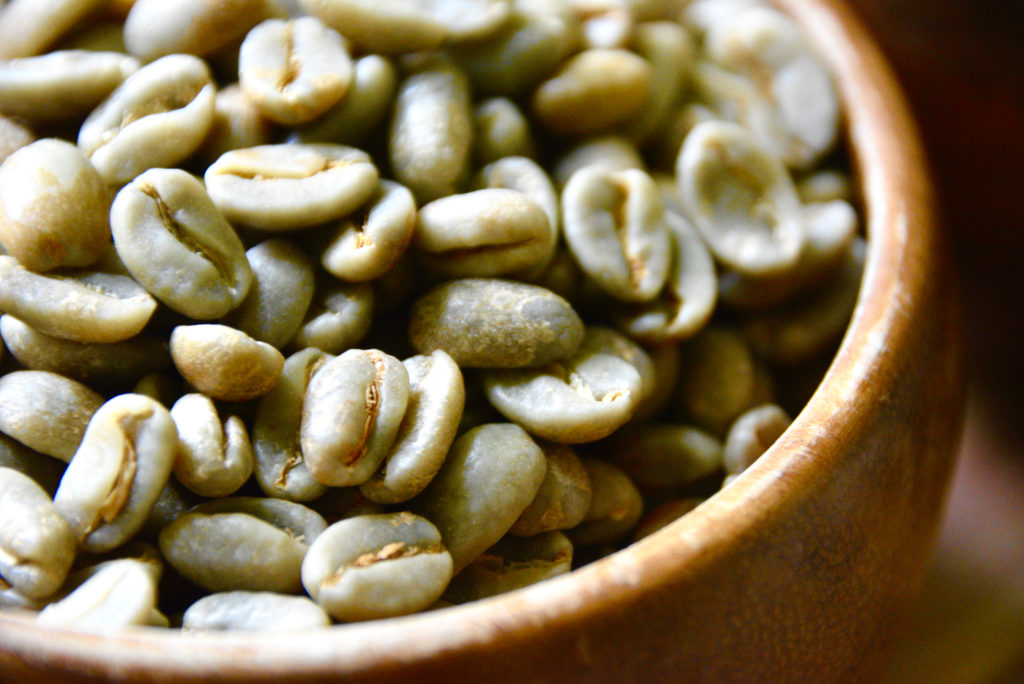
Once your beans have come in, be sure to store them away from direct sunlight and in a dry, cool place at room temperature. A cabinet away from the stove/oven is a great place. This will preserve the beans’ freshness for a longer period of time. 

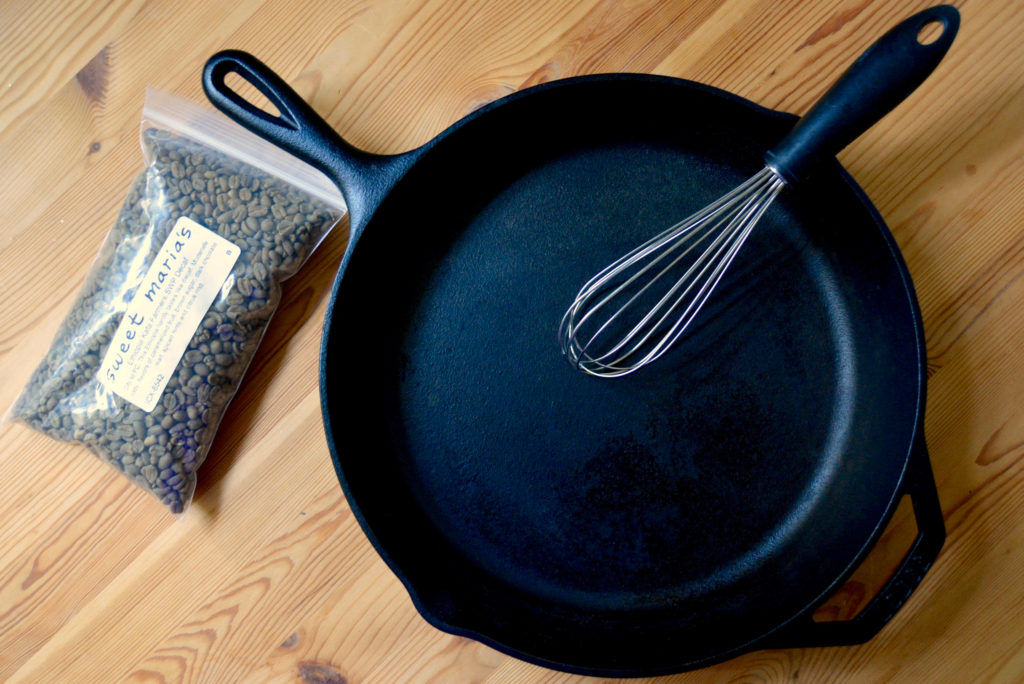
Gather the necessary roasting equipment. 

Note: I may earn a small commission when you make a purchase through some of the below links. Read my disclosure policy to learn more.

Besides beans, you’ll also need a cast iron skillet (about 12 to 15 inches), a metal whisk, two thick oven mitts, a colander, a heat resistant bowl (a saucepan also works well because of the long handle), and an airtight container for bean storage (this links to the one I use!). 

Other items that aren’t required, but will come in handy: a food scale and an infrared thermometer. 

Have all of these items ready and waiting in one location because you’ll need to access them fairly quickly throughout the roasting process. 

Open your windows and consider roasting outside if possible. 

Good ventilation is required for the home coffee roasting process — not only for a quality roast, but also for your safety. Open your windows, doors, and have an extractor fan ready so that the smoke released from the beans can escape. If feasible, consider roasting outside or in an open garage.

The smell and the smoke can be quite overwhelming, so please don’t skip this step. 

Heat up the cast iron on your stove to medium/high heat.

After you’ve gathered all of your equipment, you can heat up the cast iron to a medium/high heat on the stove for about 10 to 15 minutes. You want the pan to reach somewhere in between 300℉ and 350℉.  

This is where the infrared thermometer will come in handy to determine the heat of your pan. Having a fairly accurate temperature will help to ensure better roasting results. 

Cast iron pan with metal whisk and green coffee beans on wooden table

Weigh out about 300 to 350 grams of green beans.

Using a food scale, measure out about 300 to 350 grams of green beans. This will yield about 3 batches of coffee brews (assuming you brew about 2 to 3 cups at a time).

If you don’t have a scale, you can figure out the measurements by using measuring cups. 350 grams is equivalent to about 1 1/2 cups.

Pour the beans in the pan and stir, stir, stir. 

Next, it’s time to pour your green beans into the heated cast iron pan. As soon as the beans hit the pan, stir them constantly with the metal whisk. It’s important to use your oven mitt here because the heat will travel up the whisk quickly and could burn you. 

Stir the beans in a circular motion rather quickly. It’s also helpful to stir the beans along the edges of the pan and in the middle of the pan. You can make a sort of swirl through the middle of the pan to make sure you’re consistently moving all of the beans. At no point should you stop stirring, as this may have a negative result on the roast. 

green beans in a cast iron skillet being stirred with a metal whisk

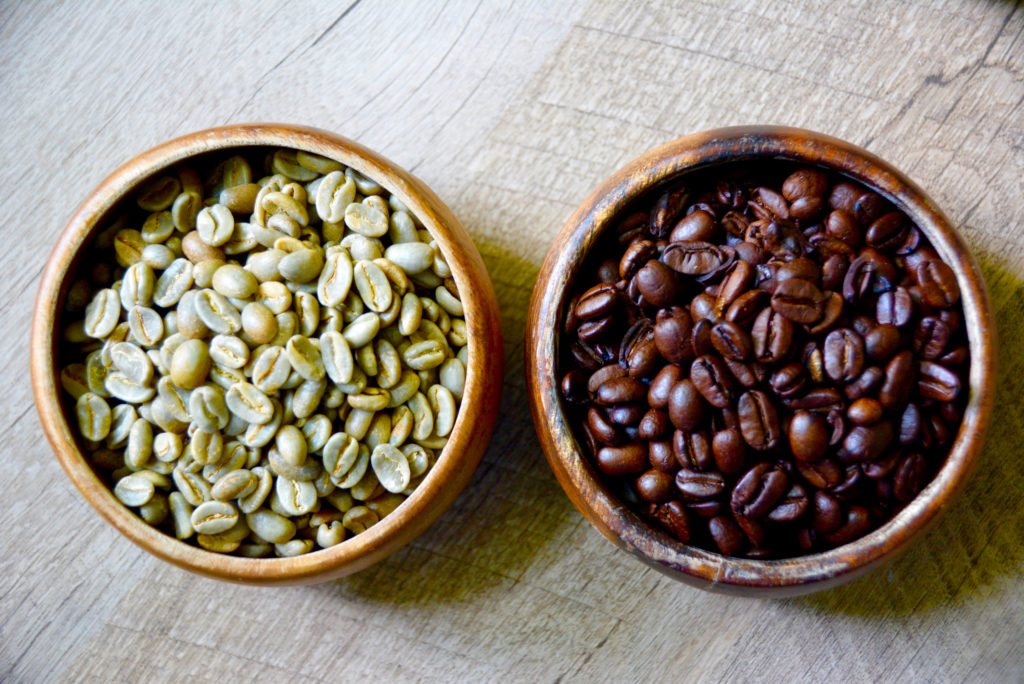
The beans will transform before your eyes from green to yellow to yellow-gold to a light brown. Ideally, you want all of the beans to be the same color. A consistent color among all your beans means that you’re properly stirring the beans and exposing them evenly to the heat of the pan. You’ll continue stirring until you hear the first crack, which is described in the next step below. 

Once you hear the first crack, remove pan from heat. 

You can think of this next stage like making popcorn. Once the popcorn kernels are hot enough, you’ll hear many kernels rapidly pop. After most of the kernels have popped, the popping slows down and you listen for 2 to 3 second breaks in between pops. That’s when you can remove the kernels from heat.

Similarly, the coffee beans will begin to pop or crack simultaneously when they’ve gotten hot enough — this stage is fittingly called the first crack. Once the cracking slows down, like in making popcorn, remove the pan from heat immediately. 

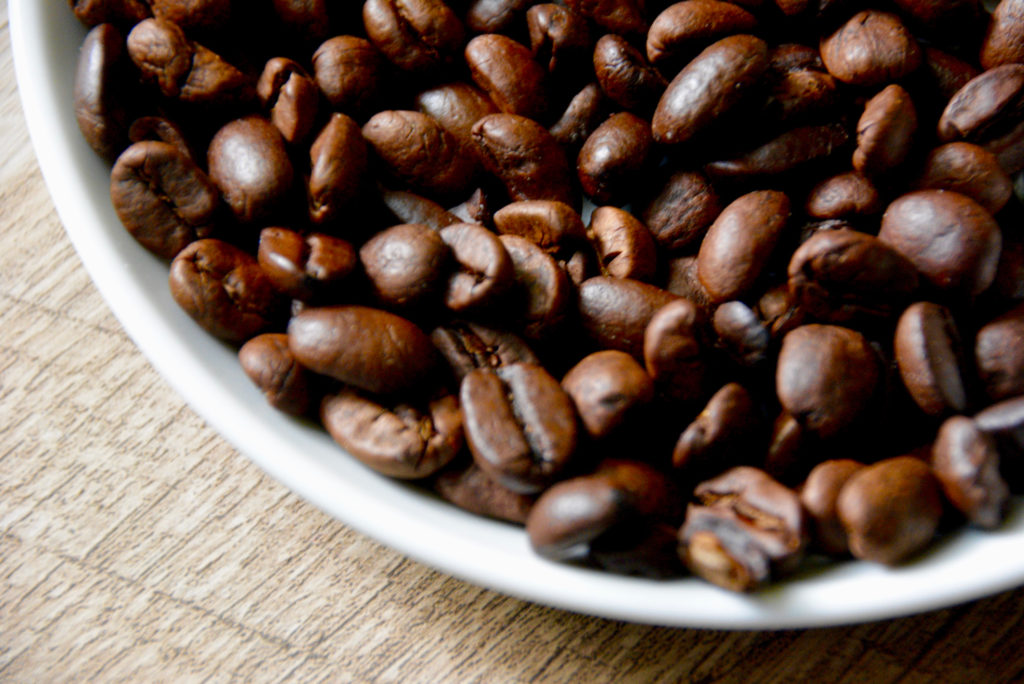
At this point, your beans should be a light brown shade. If there is still some yellow tints left on your beans, I would advise leaving the beans on the heat for a bit longer and continue to stir until all of the beans are a light brown or brown.

If there are tinges of dark yellow or gold left on your beans, they won’t grind down and may damage your grinder! This color means they need more time on the stove.

Optional Step: For a darker roast, keep stirring the beans until you hear a second crack. 

If you prefer a darker roast, you won’t stop stirring the beans at the first crack, but will continue to roast your beans until you hear a second crack. That’s right, you’ll hear another round of cracking if you continue roasting.

This produces a dark roast, whereas stopping at the first crack produces a light roast. 

 
latte in a garden

Want to brew barista-level coffee at home?

Join my newsletter to receive my free home-brewing guide. PLUS, you’ll get instant access to ALL freebies in my resource library including bonus recipes, pairing ideas, and more brew guides! 


Pour beans into a bowl or a saucepan and grab your colander to remove the chaff. 

After you’ve removed the beans from heat, quickly pour them into a heat-proof bowl or into a saucepan.

Note: You’ll need to do this next step outside to prevent from making a huge mess in the house.

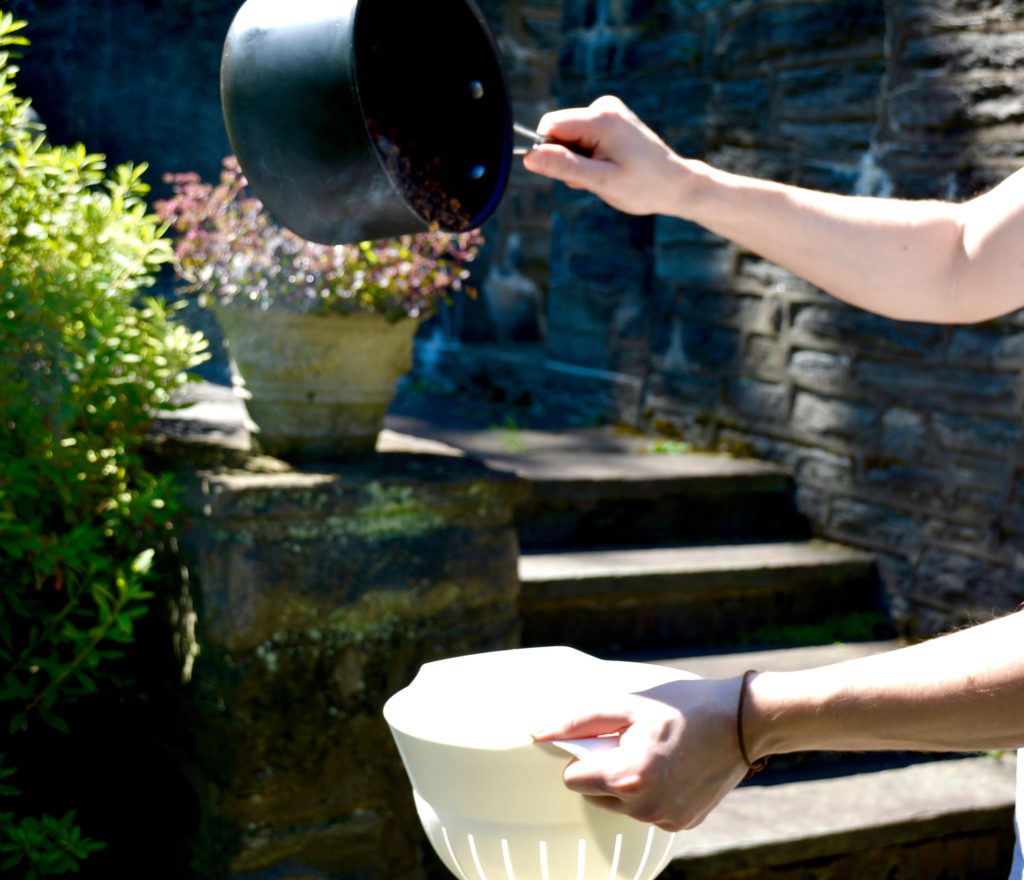
Remove the chaff by pouring the beans from the bowl or saucepan into the colander. I like to hold the bowl high up in the air and catch the beans in the colander, which I hold with my other hand near my waist. The chaff will start to blow away as you exchange the beans from vessel to vessel. 

You can also blow air on the beans using a fan as they are being poured from one vessel to the other to make the chaff removal process go quicker. When most of the chaff is gone, pour the beans into the bowl once again.

Let your beans cool down to room temperature before storing them. 

Next, you’ll let the beans sit out at room temperature in the bowl to cool down. Once they have cooled, you can store your coffee beans as normal.  

For best storing practices, I wrote an article for Coffee with the Queen on how to properly store coffee beans (view here). The gist is to store your beans in an opaque, airtight container away from light, heat, and moisture.

Keep the beans in the container for at least 24 hours before using them to make coffee. 

At this point, you probably want to brew a batch of coffee with your freshly roasted beans right away, but it’s best to let the beans degas in the storage container first. 

two wooden bowls filled with green beans and roasted coffee beans

Ideally, you should wait at least three days before using your coffee beans for best results.

Note: this waiting period is more for light roast coffee. If you went for a darker roast, you can go ahead and brew the coffee closer to the roast date. 

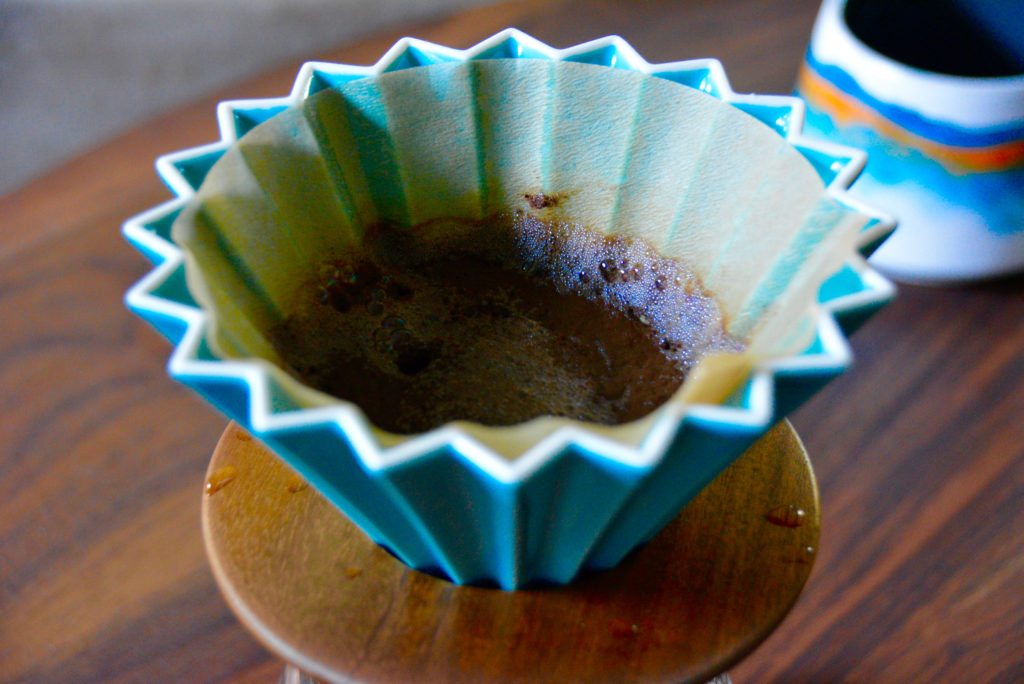
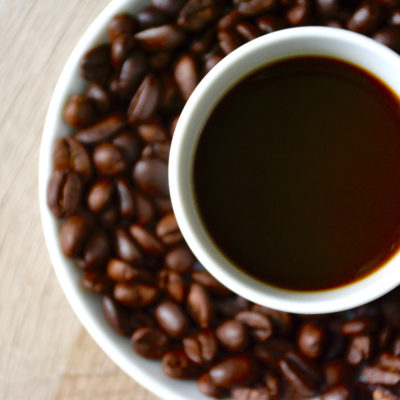
Treat your beans with respect and brew them with the pour over method. 

It would be a shame to roast amazing coffee beans and then put them in a drip coffee machine. To extract the most flavor from your freshly roasted beans, I highly recommend using the pour over method.

Chemex, Origami, the Hario V60 or the Kalita Wave Pour Over are all excellent instruments for brewing pour over coffee. See my post for the perfect Chemex recipe here.

Tag me on Instagram @bakedbrewedbeautiful, so I can see your beautiful brews!

After you’ve finished brewing or roasting, take a snapshot of your beans or your coffee and let me know how your roast turned out! Tag me on Instagram @bakedbrewedbeautiful or use the hashtag #bakedbrewedbeautiful, so I can see your beautiful creations — happy brewing.


Did you get your 5 FREE Bonus Coffee Roasting Tips Yet?

Join my email list to receive exclusive access to my FREE resource library to grab my 5 Must-Know Tips For All Those New To Home Coffee Roasting.

PLUS, be the first to grab more free brew guides and other awesome coffee freebies. Sign up below!

5 Home Coffee Roasting Tips Guide

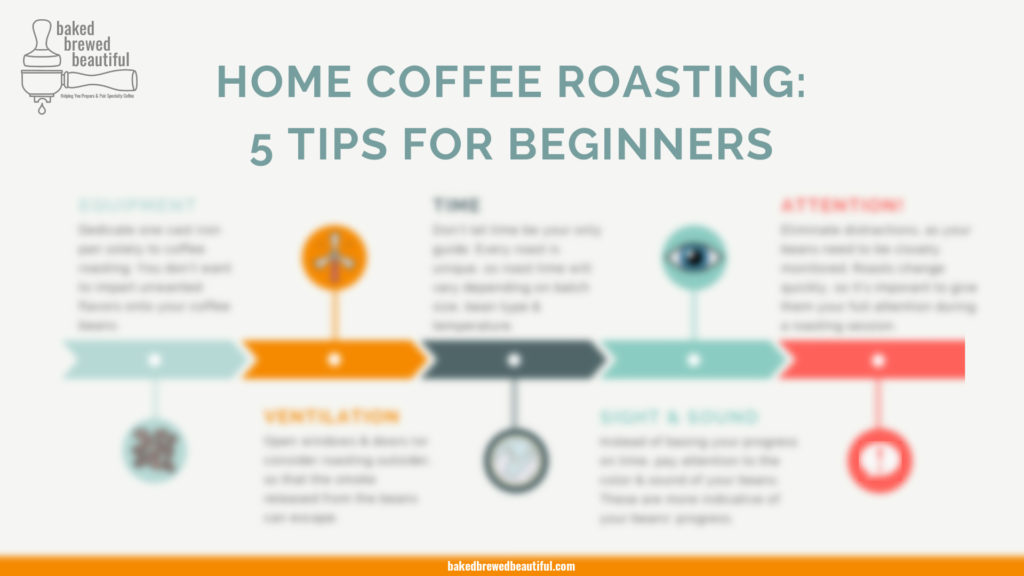
Attention Home Coffee Roasting Newbies!


home coffee roasting starter kit
Home Coffee Roasting Starter Kit Giveaway: Enter to Win
coffee cup with coffee beans on a saucer
All The Coffee Terms You Need To Know
green coffee beans and home roasted coffee beans
Home Coffee Roasting 101: 3 Helpful Tips

Add a Comment

« The Best Chocolate Chip Oatmeal Cookie Cream Pies (Mini Pies Recipe)
Iced Oat Milk Matcha Latte Recipe — Only 4 Ingredients »

Leave a Reply Cancel reply

Your email address will not be published. Required fields are marked *

logo
Food Advertisements by

Coffee Shop

  • Digital Coffee Journal (Fillable PDF) $24.00 $13.00
  • Brewing Guide Luxe Notecard Set (Set of 3) $15.00 $12.00
  • AeroPress Brewing Guide Luxe Notecard $7.00 $5.00
  • Moka Pot Brewing Guide Luxe Notecard $7.00 $5.00
bread with Chemex coffee and honey on a blue background

Coffee Recipes By Baked, Brewed, Beautiful

Coffee Recipes By Baked, Brewed, Beautiful
This affogato recipe is not only bursting with complementary sweet, bitter flavors but it only requires 2 ingredients!

I value each & every subscriber. It's quick and easy to subscribe, just click here: https://rb.gy/acljrf  
You'll be the first to learn of my newest coffee recipes!  

Links from video: 
- Top-Tier Vanilla Bean Ice Cream Recs - Find Them Here: https://bakedbrewedbeautiful.com/affogato/
- Pour Over Tutorial: https://bakedbrewedbeautiful.com/what-is-pour-over-coffee/ 

The blog post that coincides with this video is: https://bakedbrewedbeautiful.com/affogato

Best Affogato Recipe

Ingredients:
2 shots of espresso
½ cup vanilla bean ice cream
Salted brownies for garnish (optional)
Chocolate shavings (optional)

Instructions: 
1. Scoop vanilla bean ice cream into a 4 ounce glass and place in freezer while you prepare the espresso.

2. Pull the espresso shots. Immediately, pull glasses of ice cream out and pour the espresso over the ice cream.

3. Sprinkle with chocolate shavings and salted brownie crumbs. Garnish the glass's rim with a one-inch square of salted brownies.

New videos every Thursday. 
#affogato #affogatocoffee #affogatoespresso #affogatorecipe #affogatocoffeerecipe #coffeerecipes #coffeerecipe #coffeeandicecream
.............................................................................................................................
Follow me at:
Blog: http://bakedbrewedbeautiful.com/
Facebook Group: https://www.facebook.com/groups/coffe...
Facebook Page: https://www.facebook.com/bakedbrewedb...
Instagram: https://www.instagram.com/bakedbrewed...
Pinterest: https://www.pinterest.com/bakedbrewed...

Credits:
Music: Baked, Brewed, Beautiful Theme Song written & produced by Christopher Elwell (piano & drums) & Cheyenne Elwell (violin) 
Videography: Cheyenne Elwell on a D5200 24.1 MP CMOS Digital SLR Camera
Recipe: A Cheyenne Elwell original
Affogato Recipe (Espresso & Ice Cream)
YouTube Video UCkqfhp5eJcNaQEW1iaKcWXg_7ijP8EVjEDg
Learn to pair coffee with food following these 5 coffee and food pairing best practices. Examples included in the video!

Download these FREE Resources for Your Food and Coffee Pairing at Home: 
Food & Coffee Pairing Chart + Food & Coffee Pairing Guide  - https://bakedbrewedbeautiful.com/food-coffee-pairing-chart/ 
Coffee & Food Pairing eBook - https://bakedbrewedbeautiful.com/food-coffee-ebook/ 

Blog Post for Coffee and Food Pairing Etiquette:
https://bakedbrewedbeautiful.com/food-and-coffee/ 

Note: I may earn a small commission when you make a purchase through some of the below links. Read my disclosure policy to learn more.

Equipment & Ingredients From The Video:
Chemex Coffee Maker - https://amzn.to/3CSq9Iy 
Blue Bottle Mug (12 oz.) - https://amzn.to/3jPnK8Q
Fab Slabs Natural Wood Cutting Board - https://amzn.to/2VQmoCC 
Nora's Naturals Organic Coffee - https://www.coastalcoffeecollective.com/
Orange & Bourbon Marmalade - https://blakehillpreserves.com/products/orange-bourbon-marmalade

New videos every Thursday.

food pairing with coffee, coffee and fruit pairing, coffee and chocolate pairing, coffee food pairing chart, coffee pairing food, coffee and food pairing coffee and food, what to eat with coffee in the morning, coffee food, coffee snacks, coffee pairings, coffee & food, food with coffee, coffee with food, best coffee combinations
.............................................................................................................................
Follow me at:
Blog: http://bakedbrewedbeautiful.com/
Facebook Group: https://www.facebook.com/groups/coffe...
Facebook Page: https://www.facebook.com/bakedbrewedb...
Instagram: https://www.instagram.com/bakedbrewed...
Pinterest: https://www.pinterest.com/bakedbrewed...

Credits:
Music: Baked, Brewed, Beautiful Theme Song written & produced by Christopher Elwell (piano & drums) & Cheyenne Elwell (violin) 
Videography: Cheyenne Elwell on a D5200 24.1 MP CMOS Digital SLR Camera
Coffee and Food Pairing: 5 Best Practices & 5 Best Combinations
YouTube Video UCkqfhp5eJcNaQEW1iaKcWXg_mhp8dZoxZd0
Iced Oat Milk Pumpkin Spice Latte Recipe 

* Make a delicious non-dairy version of the famous fall pumpkin spice latte.
* Barista blend oat milk will allow you to create a slightly healthier version (but equally delicious) of this Starbucks classic.
* You can also enjoy this drink warm by following the modified recipe below

Thanks a ton for watching! Make sure to SUBSCRIBE for more videos: https://rb.gy/acljrf  
You'll be the first to learn of my newest coffee recipes!  
Disclaimer: product links may include affiliate links.

Links from video: 
To enter the "Word of the Week" for a chance to win a Home Coffee Roasting Starter Kit, please visit: http://bakedbrewedbeautiful.com/contest. The word is “AUTUMN” this week! 

Blog Post for the Iced Oat Milk Pumpkin Spice Latte Recipe: https://bakedbrewedbeautiful.com/oat-milk-pumpkin-spice-latte/

Equipment & Ingredients From The Video:
Barista Blend Oat Milk - https://amzn.to/3zH0Oiv 
Cheesecloths - https://amzn.to/3iaolTg 
Organic Pumpkin Puree - https://amzn.to/3zGgC58 
Organic Pumpkin Pie/Pumpkin Spice - https://amzn.to/3l571R9 
Organic Brown Sugar- https://amzn.to/3zD4pOs  
Stainless Steel Black Straws - https://amzn.to/3iTemRo

Iced Oat Milk Pumpkin Spice Latte Recipe

Pumpkin spice mixture:
½ cup oat milk (barista blend if possible)
⅓ cup brown sugar (white is okay too)
2 tsp pumpkin puree
1 tsp pumpkin pie spice 
1 tsp vanilla extract
Latte
2 shots of espresso
1 cup oat milk 
1 tbsp pumpkin spice mixture
½ cup whipped cream (optional)
2 ice cubes (if enjoying cold)

Pumpkin spice mixture:
1. In a small sauce pan, add oat milk, sugar, pumpkin puree, and pumpkin pie spice. Bring to medium heat and whisk ingredients together until sugar is dissolved. Do not let it boil.
2. Once the mixture starts to steam and the sugar is completely dissolved, remove the pan from heat and stir in the vanilla. Strain through a fine mesh filter into a glass jar for easy storage.
Latte:
3. Pull your espresso shots, and pour inside your desired coffee mug. Add the strained pumpkin spice mixture to the espresso and stir well.
4. If enjoying warm (skip to next step if enjoying iced), steam your milk using a steam wand, milk frother, or mason jar (see post above to make foam without a frother) until foamy. Pour velvety milk on top of the espresso mixture.
5. For iced pumpkin spice lattes, add 2 to 3 ice cubes or cold brew coffee cubes to your mixture.
6. Top with whipped cream, if desired, and dust with pumpkin pie spice. Enjoy!

New videos every Thursday. 

Iced pumpkin spice latte, how to make a pumpkin spice latte, pumpkin spice latte, pumpkin spice latte, pumpkin spice latte recipe, healthier starbucks drinks, starbucks, starbucks pumpkin latte, pumpkin latte, starbucks pumpkin spice latte recipe, how to make pumpkin spice latte healthier, how to make pumpkin spice latte with less sweet, how to make pumpkin spice latte vegan

.............................................................................................................................
Follow me at:
Blog: http://bakedbrewedbeautiful.com/
Facebook Group: https://www.facebook.com/groups/coffe...
Facebook Page: https://www.facebook.com/bakedbrewedb...
Instagram: https://www.instagram.com/bakedbrewed...
Pinterest: https://www.pinterest.com/bakedbrewed...

Credits:
Music: Baked, Brewed, Beautiful Theme Song written & produced by Christopher Elwell (piano & drums) & Cheyenne Elwell (violin) 
Videography: Cheyenne Elwell on a D5200 24.1 MP CMOS Digital SLR Camera
Recipe: A Cheyenne Elwell original
Iced Pumpkin Spice Latte With Oat Milk Recipe
YouTube Video UCkqfhp5eJcNaQEW1iaKcWXg_UXMXFdkbeKc
Load More... Subscribe
About

Hey there!

I'm Cheyenne — Seattle-based coffee lover & writer. On this blog, you'll find brewing tips & tutorials, coffee & food pairing recipes, and FREE COFFEE GUIDES for your favorite brew method.
Happy Brewing!

5 Food & Coffee Pairing Best Practices

https://www.youtube.com/watch?v=mhp8dZoxZd0
logo
Food Advertisements by

Categories

  • Baked
  • Beautiful
  • Brewed

Popular Posts

A Latte with Roz: Visiting the Frasier Set and the Signed Saucer I’ll Never Forget

Person Pouring Water from White Ceramic Mug

Pairing Your Love for Coffee with Outdoor Escapes

Fine Dining Delights: Crafting Perfect Coffee and Food Matches for Formal Occasions

coffee grounds bowl in front being added to houseplants

Exploring 4 Plants That Love Coffee Grounds & 3 Plants That Don’t

iced honey lavender latte in a mason jar outside

Instant Iced Honey Lavender Oat Milk Latte Recipe

lemon poppy seed loaf cake on marble

Moist Lemon Poppy Seed Loaf Cake with Lavender Glaze Recipe

flash-chilling iced coffee with plants in background

How To Make Flash-Chilled Iced Coffee

Big Guns Coffee: North Carolina’s First Hydroponic Coffee Farm

logo
Food Advertisements by

bakedbrewedbeautiful

Seattle-Based Coffee Blog ☕️
Helping You Prepare & Pair Speciality Coffee
...
Follow along on the blog👇

𝙱𝚊𝚔𝚎𝚍, 𝙱𝚛𝚎𝚠𝚎𝚍, 𝙱𝚎𝚊𝚞𝚝𝚒𝚏𝚞𝚕
There’s something quiet and grounding about sipp There’s something quiet and grounding about sipping coffee in the open air.

This week on the blog, we’re sharing a thoughtful guest post all about coffee and the outdoors—from trailside brews to simple backyard mornings. It’s a gentle reminder that sometimes the best coffee moments happen far from the kitchen.

Take a moment to read, reflect, and maybe plan your next outdoor sip.

Where do you love to enjoy your coffee when the sky’s the ceiling?

Photo by Taryn Elliott, Powered by Pexels.
@tea_for_taryn 
#coffeeoutside #slowcoffee #outdoorcoffee #coffeetime #coffeelove #natureandcoffee #coffeeblog #bakedbrewedbeautiful #coffeeandcalm #sipandslow #backyardcoffee #morningritual #coffeewanderer #coffeethoughts #intentionalliving
Daphne walked into Café Nervosa… with a latte o Daphne walked into Café Nervosa… with a latte obsession, a white-cardiganed baby Fras, and dreams of sitting on that couch. ☕🛋️

We visited the actual Frasier set at Julien’s Auctions—and yes, it was everything.

Swipe to see: 
📍The Nervosa chairs + latte cups
🛋️ A full-family couch moment
☕ A signed espresso cup from Roz (😭)
🧣 My Daphne-inspired look
👶 Courtland dressed as Fras
🫶 Caffe Vita serving real coffee at the exhibit
🎬 A very grateful fangirl moment

This whole experience made me fall in love with coffee culture all over again—how it brings people together, adds ritual to daily life, and sometimes... gets you a signed saucer from Peri Gilpin.

Full story + photos now live on the blog—link in bio!

#FrasierSet #CafeNervosa #RozDoyleForever #BakedBrewedBeautiful #CaffeVita #FrasierCrane #CoffeeAndCulture #TVHistory #seattlecoffee
Came for a birthday latte, stayed for the flavor n Came for a birthday latte, stayed for the flavor notes.
Back on here with stories, pop-ups, and opinions on foam texture. Let’s do this. ☕🎉

#coffeetime #bakedbrewedbeautiful #coffeeblogger #oatmilklatte #thirdwavecoffee #seattlecoffee #coffeebreak #cafestagram #coffeelover
Cinnamon rolls and coffee ☕️ . . . #coffeepai Cinnamon rolls and coffee ☕️ 
.
.
.
#coffeepairing #cinnamonrolls #cinnamonrollsrecipe #coffeeandfood #coffeeandfoodpairing
Load More... Follow on Instagram
  • Email
  • Facebook
  • Instagram
  • Pinterest

Affiliate disclosure: As an Amazon Associate, I may earn commissions from qualifying purchases from Amazon.com.
You can learn more about our affiliate policy here.

  • About
  • Shop
  • Contact
  • Work With Me
  • Disclaimer & Disclosure
  • Terms
  • Privacy Policy
  • Shipping & Returns
  • Freebie Library