The Flair Pro 2
$262.65 – $279.65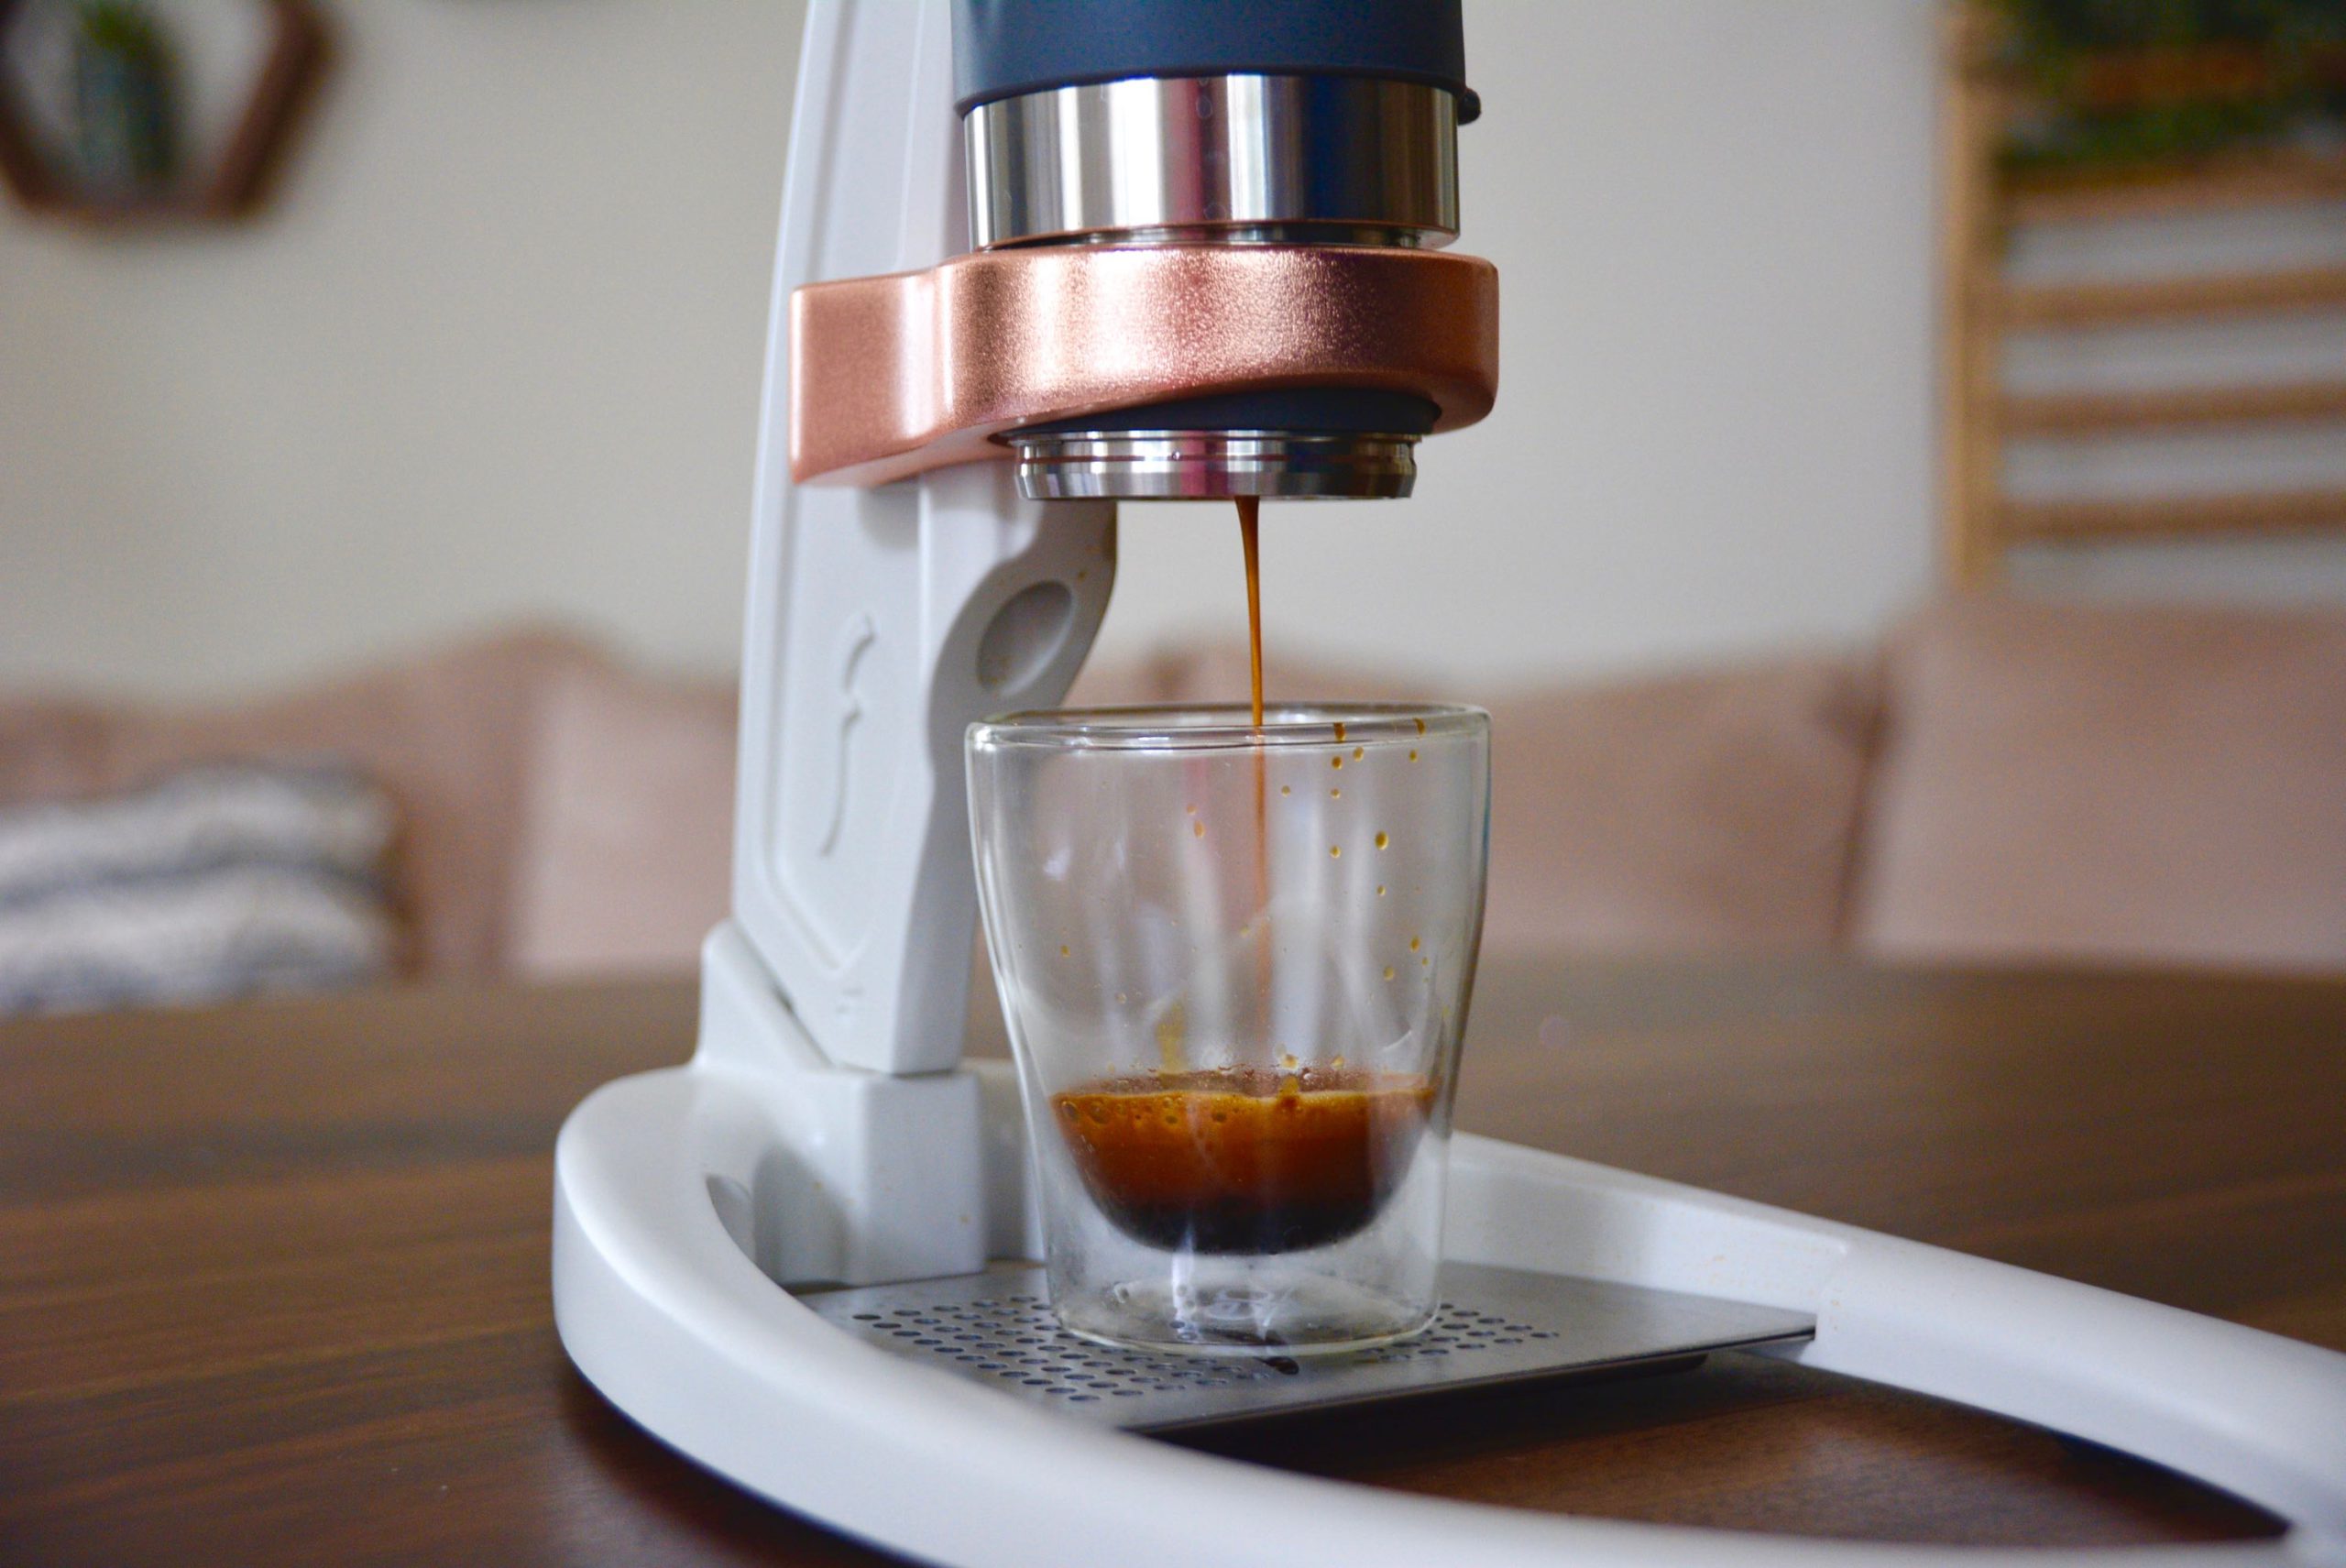
Pros
- Stunning, sleek aesthetic
- Brews high-quality espresso
- No electricity require
- Quick cleanup
- Budget-friendly
Cons
- Very hands-on
- Learning curve to get familiar with parts
- User manual lacks clarity
- Burr grinder and fresh beans required

A manual espresso maker ideal for someone who loves espresso and the espresso-making process.
The lever-driven espresso machine was brought about in 1947 by Achille Gaggia. This invention revolutionized espresso coffee in the home and cafe sphere.
Yet like, manual brew coffee, manual espresso brewing has experienced a sort of renaissance as many are going back to the basics in order to fully experience and appreciate the process of making their morning java. Manual brewing also provides a much more controlled environment, which is ideal for making excellent coffee and espresso.
One company that has taken on the task of bringing the manual espresso machine back is Flair Espresso. They are known for their elegant, yet simplistic lever espresso machines that produce flavorful espresso without any electricity. We tested the latest version of their Signature Flair known as the Flair Pro 2. In using it for several weeks, we evaluated its setup, espresso quality, cleanup, price, and design. Read on to see what we discovered.
Design: Sleek, small, and portable
The Flair Pro 2 boasts of a sleek and minimalist aesthetic. Featuring a lever and a base, this portable brewing device stuns with its copper-plated portafilter base and its matte white body. This manual espresso machine is also available in matte black and brushed chrome.
The Flair Pro 2 is composed of stainless steel and aluminum cast materials, giving it a sturdy and durable construction that will last a long time. It weighs about 7 pounds, which isn’t heavy but offers a weight that ensures it was made with quality.
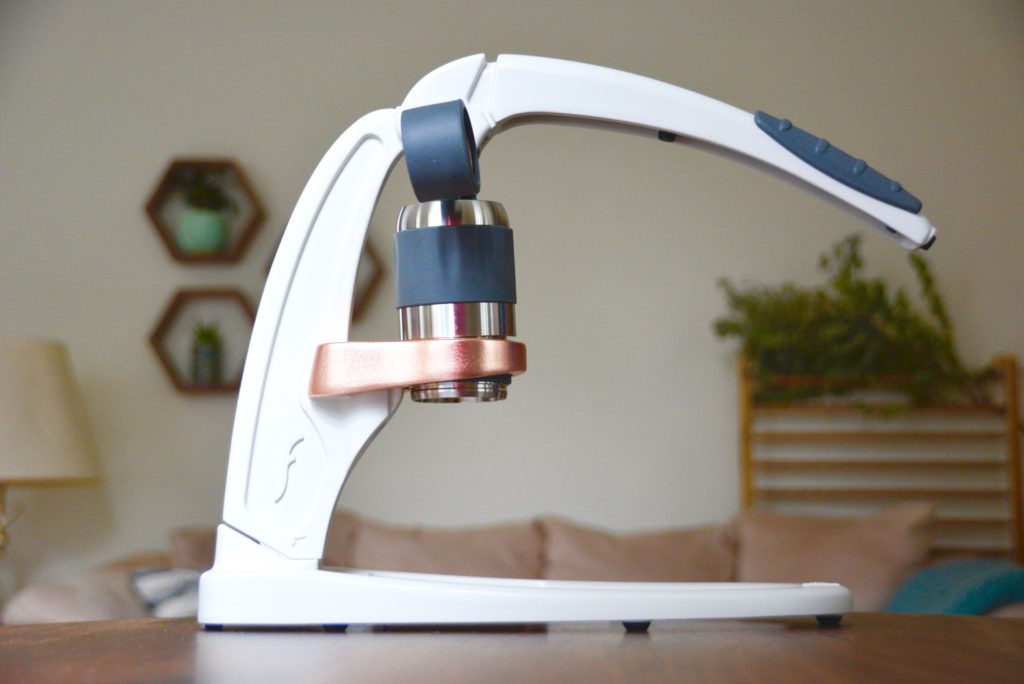
In terms of size, this espresso machine is very small in comparison to electric espresso machines. Measuring 14 inches by 10 inches by 4 inches, it has a very small kitchen counter footprint. This allowed me to fit it nearly anywhere where I could find a small nook on my counters. Included with this manual espresso machine is also an optional part to permanently attach Flair to the counter if desired.
What's also convenient about the Flair Pro 2 is that it's very portable. If I wanted to bring it along with me in my travels, it's possible with this little guy. It comes with a stylish, all black carrying case (12.5 inches by 9 inches by 3.25 inches), making it very travel-friendly if you’re one who wants espresso on-the-go.
Additional Materials: Burr grinder and freshly roasted beans
In order to use the Flair Pro 2, you will need to purchase freshly roasted coffee beans (roasted within the last two weeks), and a quality burr grinder. A burr grinder will give you that fine consistent and quality grind required for true espresso. This proper grinding technique is a skill that will also be necessary to get results from this manual espresso machine. See this piece on how to grind coffee beans properly.
Setup: Requires a lot of reading, patience, and maybe some trial & error
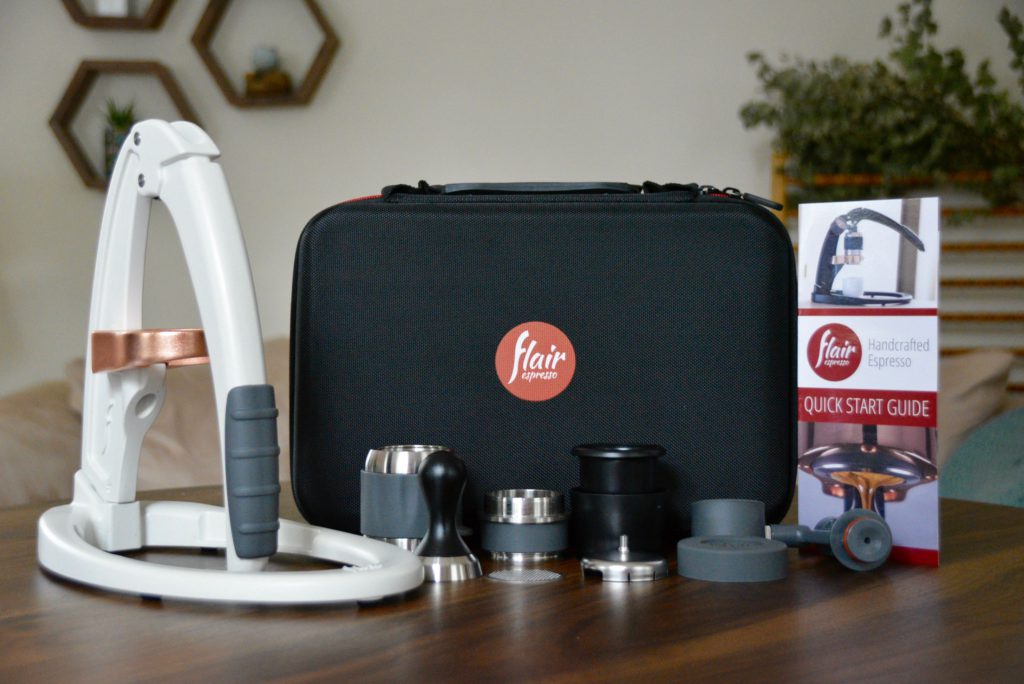
In terms of setup, I have to be honest and admit the Flair Pro 2 is quite daunting once you take all of the pieces out of the carrying case. There are over 10 individual parts, not to mention they are all relatively small and look very similar to one another. This made it all the more challenging to setup.
Now, I’m not a complete novice when it comes to espresso-making, so I was familiar with some of the pieces included such as the portafilter, the tamper, and the pressure gauge. However, there were still a number of parts I had to refer to the included instructions to learn their purpose. This elongated the setup process for me.
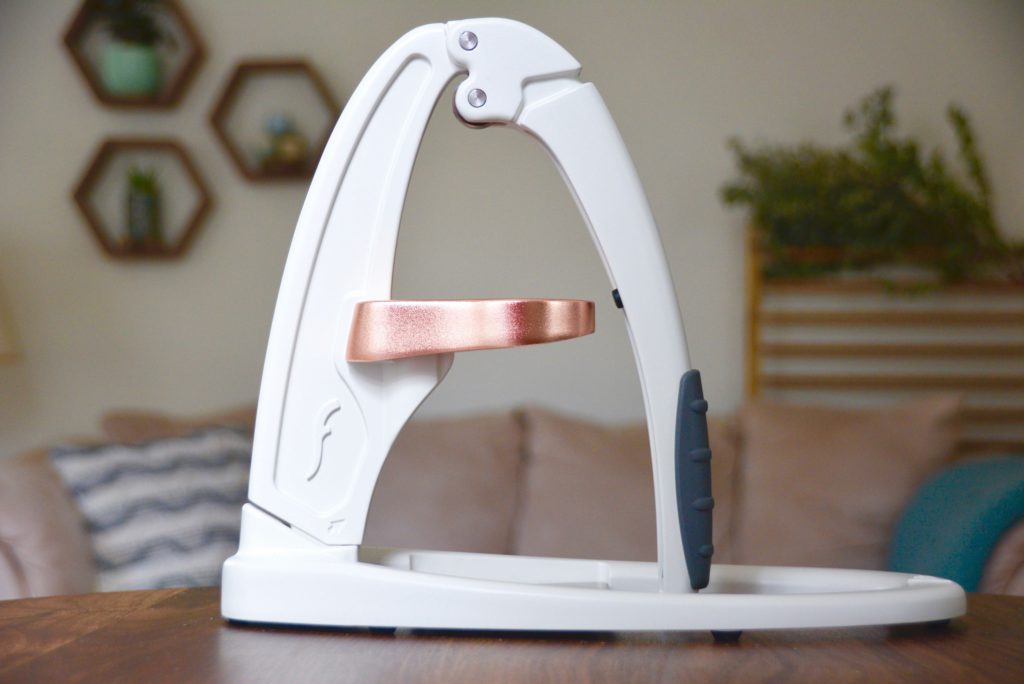
To set the Flair Pro 2 up for first use, I cleaned all of the removable parts with warm water and soap. Next, I put it together following the included instructions. The first thing to do is to attach the lever component to the base. This step was intuitive as the two pieces fit right together (see photo above). The stainless steel dirt tray fits snugly onto the Flair base. After this, it got a bit more complicated.
The instructions from this point on weren’t super clear unfortunately. While there were images to help guide the setup, it was still challenging to identify the pieces in the instructions because, as mentioned, some of the parts look incredibly similar to other parts. Needless to say, I had a lot of trial and error in setting it up the first time. In total, it probably took about 30 minutes to get the Flair Pro 2 working for the first time. After that, it was much easier and took about 10 to 15 minutes to make an espresso.
Performance: Hands on, but mostly enjoyable
To brew an espresso with the Flair Pro 2 first things first — grind the beans (this is where the burr grinder comes in). At the same time, start to heat the water to a temperature somewhere between 194°F and 204°F. Go ahead and grind about 16 grams of beans to a very fine grind. Place the grounds inside of the dosing cup and tamp them down gently with the tamping cap. Remove the funnel and place the screen on top of the grounds now.
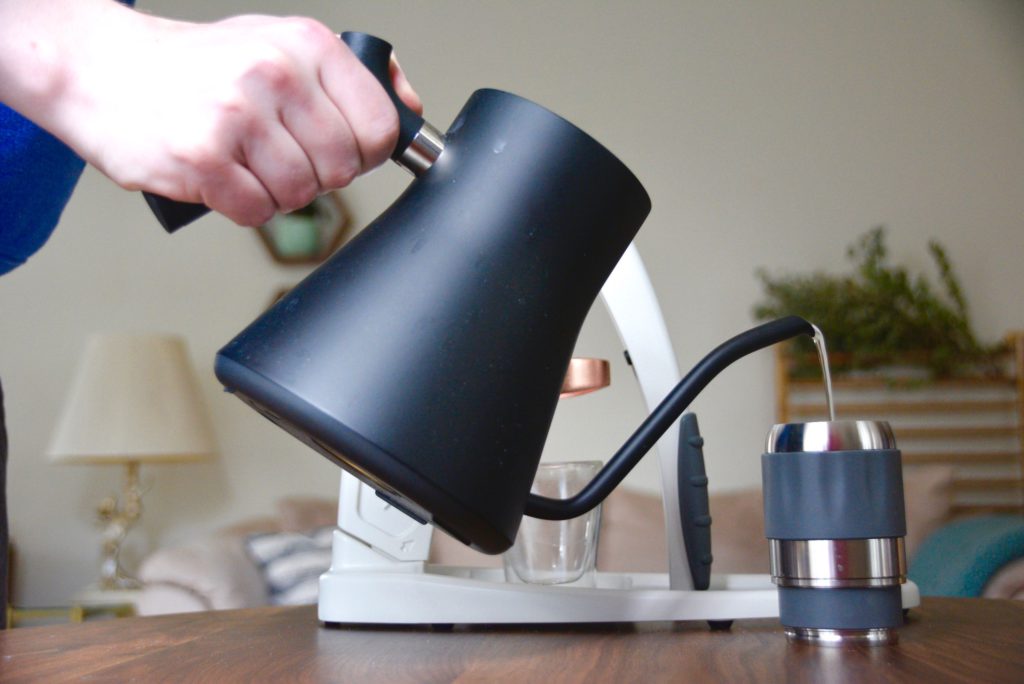
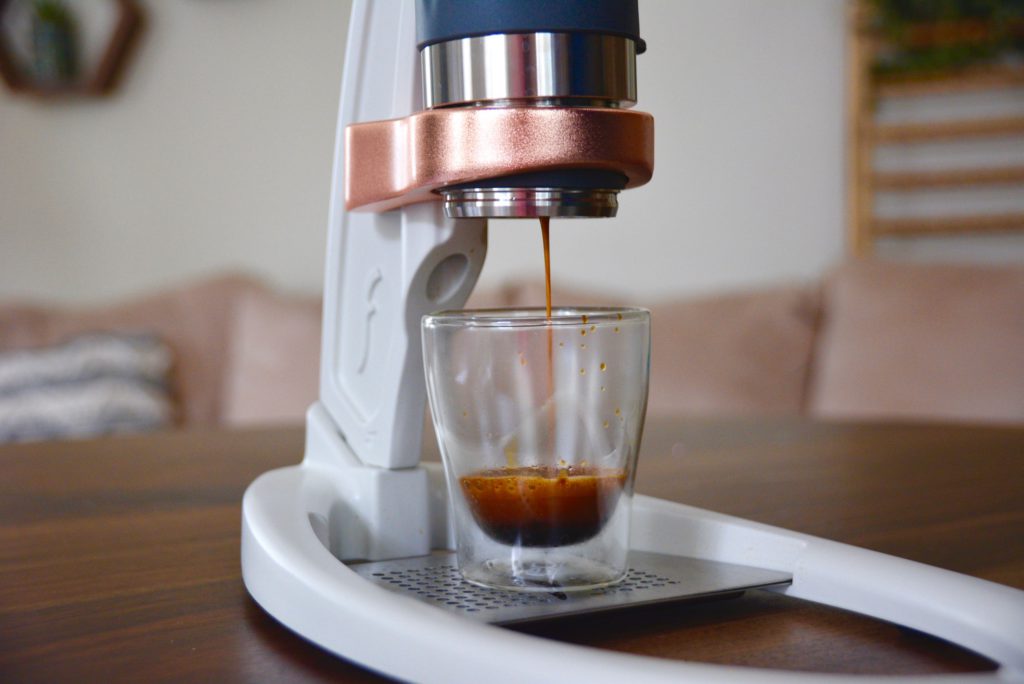
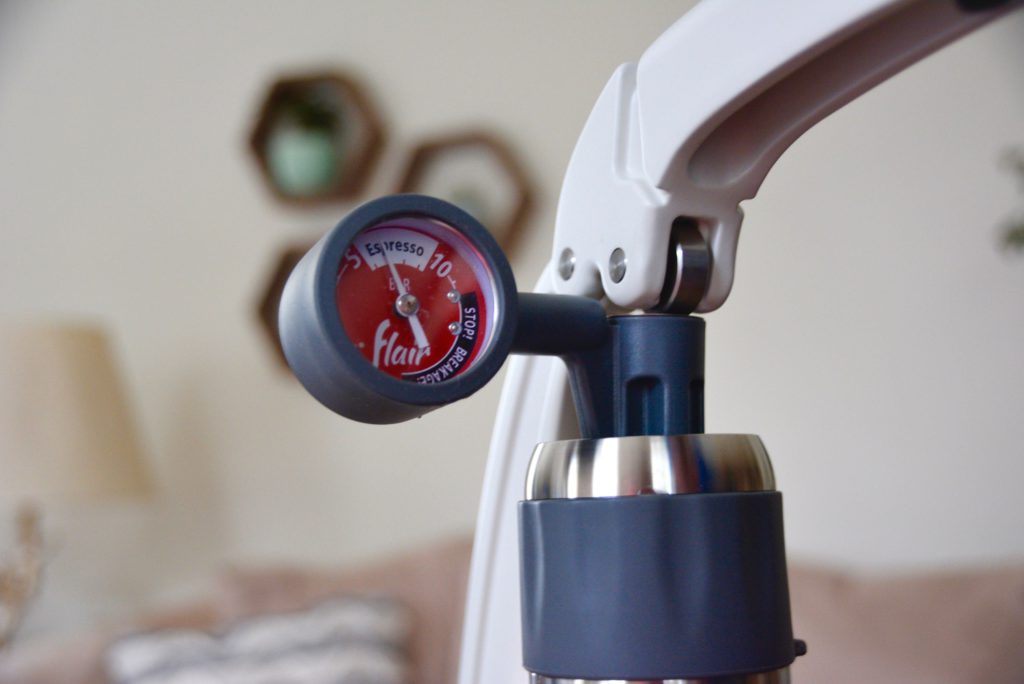
Next, it’s time to prepare the brew head (consists of the portafilter, plunger, and cylinder). Add the preheat cap onto the bottom of the cylinder and fill it with the water that was previously heating. Leave the water in for 30 seconds and then pour it out and remove the preheat cap. This is to preheat the brew head, which helps to produce a well-extracted shot (so in other words, don’t skip this step). Then, place the cylinder on top of the portafilter.
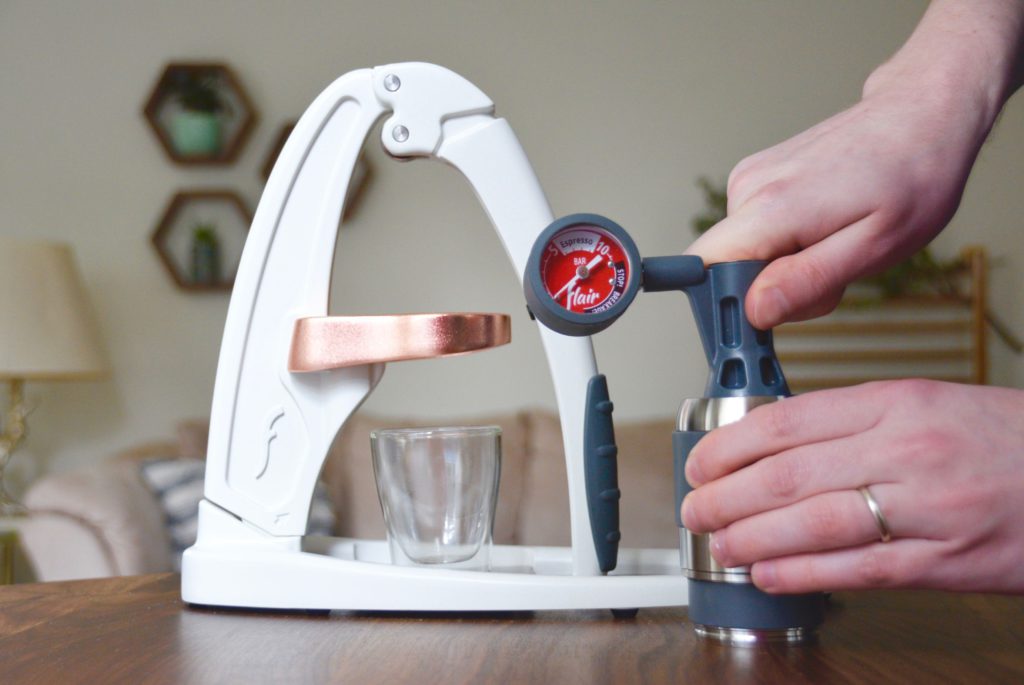
Next, add more water through the top of the cylinder until the water is visible in the well. Attach the stem of the pressure gage into the well (see photo above). Then, place the brew head onto the Flair and lower the lever to brew. It should take about 35 to 45 seconds in total and the pressure gauge should indicate it’s at the 6 to 9 bar pressure level.
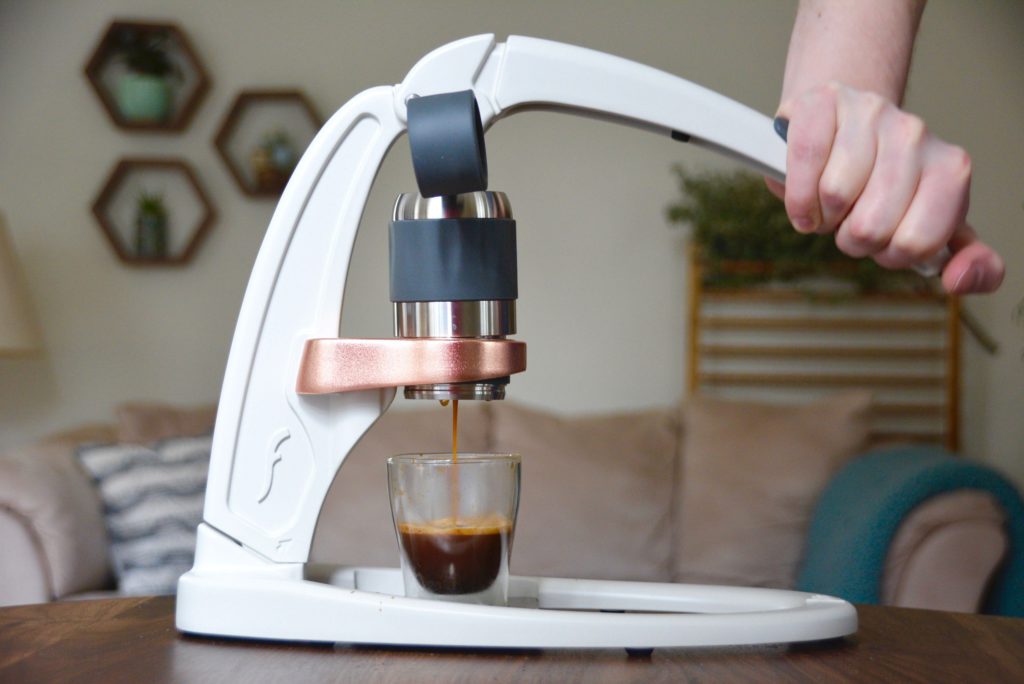
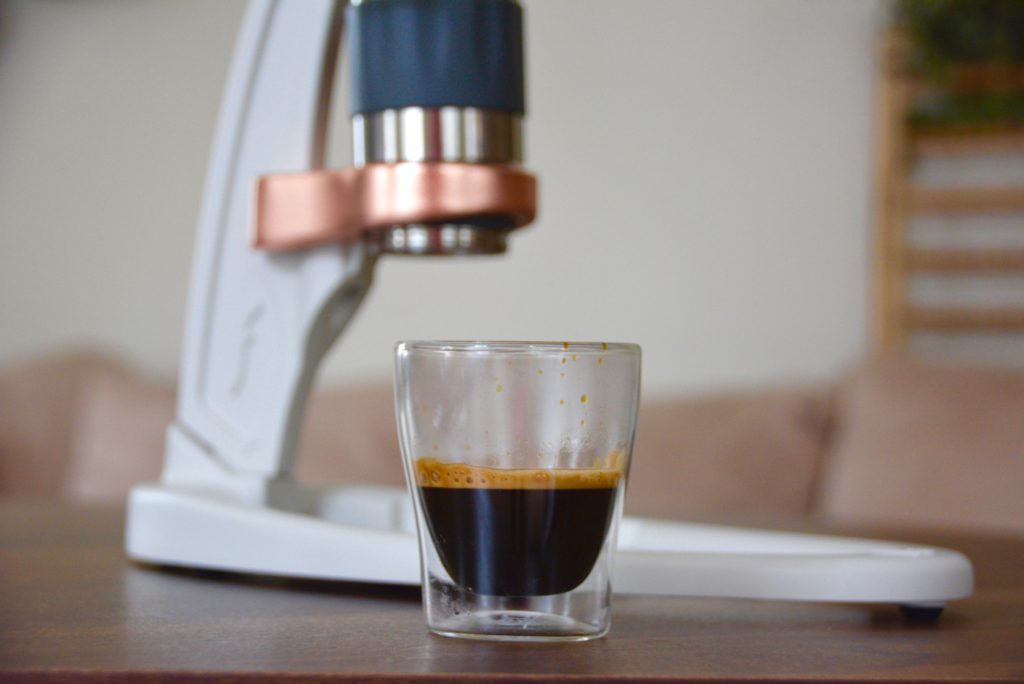
Espresso: Brews professional-level espresso, an art form of sorts
In terms of performance, the Flair Pro 2 brews high-quality espresso — equivalent to what you’d make with an electric espresso machine. It’s quite amazing. In my opinion, the brewing experience is all part of this product and it’s quite beautiful. Yes, it does take a bit longer than an electric machine — around 10 to 15 minutes — but it’s quite enjoyable at the same time. As someone who really enjoys crafting coffee at home, the Flair Pro 2 allowed me to brew my espresso and really enjoy and understand the espresso-making process to a new level.
In addition to doing it manually, I was able to determine if my grind was right by the feel of the lever. If the grind is too coarse, the lever was too easy to push down, and if too fine, it was be too difficult to push the lever down. In using it several times, I was able to get the feel of the lever and could adjust the grind accordingly for each roast.
It's easy to adjust the different variables of your coffee brewing routine such as grind size and water temperature with the Coffee Journal. This coffee brewing and tasting journal allows you to write down and track the most important values of your brew routine on a set of pre-written entry forms. This could be especially helpful for a product like the Flair Pro 2 when you're first starting out to continually refine your espresso by making minor adjustments with each use based on your previous variables and measurements.
For more information on the Coffee Journal, click here.
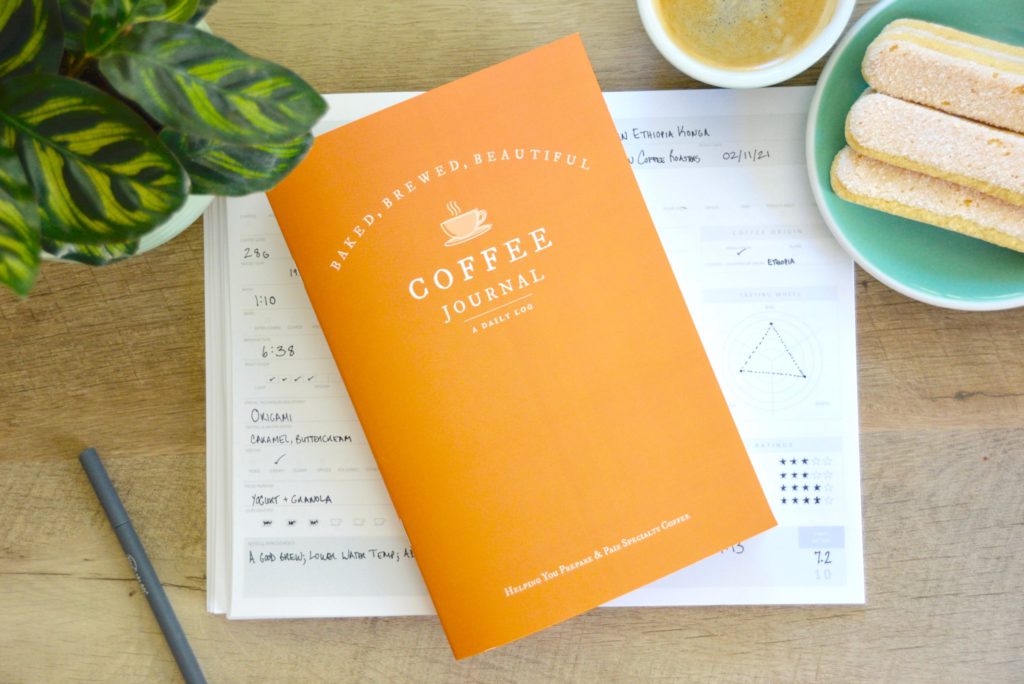
Track Your Daily Coffee Routine With The Coffee Journal
The Coffee Journal helps you to capture the most important details of your daily brewing routine in one organized location.
In recording your regular brewing process, you can refine your cup of java & enjoy more consistent, quality coffee at home.
Get Started For Only $24
Or grab the digital version for only $18
Cleaning: Quick and simple
The clean up for the Flair Pro 2 was painless. After brewing my espresso, I simply pushed the puck out of the portafilter into the trash and rinsed the rest of the parts that came in contact with the brew. It was all very easy and took less than 5 minutes.
Price: On the lower end for manual espresso machines
For a manual espresso machine, the Flair Pro 2 is on the lower end, retailing for around $279. Other manual espresso machines retail significantly higher than this (at prices nearing the $1,000 level). Considering this, the Flair Pro 2 is a great deal that brews beautiful, high-quality espresso.
The Flair Pro 2 versus La Pavoni EPC-8 Europiccola 8-Cup Lever Style Espresso Machine
Another manual espresso machine on the market is the Europicola espresso machine by La Pavoni. Unlike the Flair, it requires electricity due to its boiler that heats water for both espresso and foamed milk. This means that the water is heated for you when you turn the machine on for espresso.
Additionally, the Europicola espresso machine can also steam milk with its integrated steam wand. This water-heating feature, though convenient does come at a cost, as this unit retails for around $919. What is similar between the two is the manual lever necessary to pull the espresso shot. Both espresso makers offer this manual control over the espresso-brewing process.
Ultimately, it comes down to what your budget is and how portable of a manual espresso-maker you desire. If you want a little less work and the option to steam milk, the Europicola espresso machine by La Pavoni may be in your best interest. But if you’re interested in a totally manual espresso maker that travels well, the Flair Pro 2 is a great buy.
Final Thoughts: Buy it if you love the art of making espresso or want to learn it
If you are someone who is fascinated by the process of espresso-making or rather you’re someone who wants to get into this particular coffee hobby, the Flair Pro 2 is a wonderful way to explore and get the full espresso-making experience.
Not only is the actual espresso-maker a thing of beauty, but for the price and the results of the espresso, it’s a bargain and one you won’t want to miss out on. Buy your Flair Pro 2 today.
| Product Name: | The Flair Pro 2 |
| Product Brand: | Flair Espresso |
| Price: | $262.65 – $279.65 |
| Weight: | 7 pounds |
| Product Dimensions: | 14 × 10 × 4 inches (Flair); 12.5 x 9 x 3.25 inches(Case) |
| Color: | Matte Black, White, Chrome |
| Wattage: | N/A |
| Warranty: | 5-year limited |
| What's included: | 1 funnel & dosing cup, stainless steel tamper, screen, preheat cap, stainless steel spout, travel case, base, main post & lever, brew head, stainless steel drip tray, and pressures gauge & stem. |
7 Days To Better Coffee At Home
To help you improve your home brew, we made a series of quick coffee brewing video tutorials that we'll share over the course of 7 days.
In just 1 week, you could be sipping on one cup of incredible pour over coffee that you made yourself!


Superb upto mark review.
Was looking into details and got my all questions answered.
Now gotta buy the love machine.